
From Cadence To Vitality
In Six Steps
Uploading training data from your Cadence Cycle training sessions to your Discovery Vitality account is easy. It can be done without a smart phone or a personal cycling computer. All you need is a connection to the internet.
Short Version
For those familiar with Cadence MyPlan and PowerAgent the short version follows. Below that is the more detailed explanation.
- Login to your MyPlan account and download your ride files to your computer: Right click -> save link as.
- Open PowerAgent and import the ride files from your computer to PowerAgent.
- Export the files from PowerAgent back to your computer making sure you change the file format from csv to fit in the format field.
- Login to your Vitality account and select Wellness Tools -> Devices -> Upload Your Workout Files.
- Follow the onscreen instructions and your done.
The detailed explanation follows:
Step One: Cadence Cycling Website
- Navigate to the Cadence Cycling website and login (register if you don’t have an account).
- Once you’re logged in, the screen will show the following three tabs.

- Click on the “Rides” tab.
- Locate your ride files on the right hand side of the page.

- Download these files to your computer by right clicking each one individually and selecting “Save Link As” (MacBook).
Step Two: PowerAgent and Java
If you are already using PowerAgent, skip to step four.
Before uploading your training data to Vitality the ride files must be converted from csv files to fit files. The conversion requires the installation of CycleOps PowerAgent software.
- Navigate to the PowerTap website.
- Click on the link for a free download of PowerAgent either for Mac or PC.
- Select “Save To File” and once downloaded, double click the download and follow the instructions.

- PowerAgent requires Java Script to run, which can be downloaded for free here.
- Note that once Java Script is downloaded your browser will need to be restarted manually. Mine didn’t auto restart.
Step Three: Setup PowerAgent Profile
- Open PowerAgent.
- Select File -> New -> Add New User.
- Follow the on screen instructions to setup your profile. You don’t need to fill out everything. Just enough to establish a user name.
Step Four: Transfer Training Files To PowerAgent
- With PowerAgent still open, select File -> Import -> Activity Data.
- Locate the file on your computer and select it.
- Click “Open” to transfer file to PowerAgent.
- A screen labeled “Save Power Data” pops up.
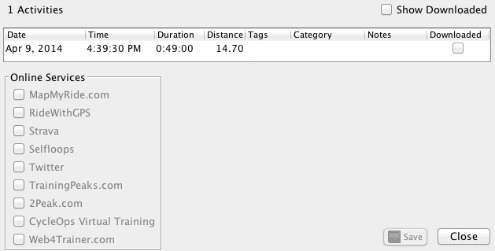
- Click “Show Downloaded” at top right of pop up.
- Select the file to transfer (if more than one file, select them all).
- At bottom right of pop up click “Save” and the files begin transferring.
- A tick will show beside each file when it is downloaded.
Step Five: Convert Files From csv To fit
You are now ready to convert the files to the right format.
- First select your user name from the list in the top left box. The list of files you uploaded should appear in the box below that.
- Select a file to convert. You can only do this one at a time or all the converted files will have the same name.
- At the top of the screen select File -> Export -> Activity Data and the following screen will appear.

- Give the file a name in the top field.
- Select a location to save the file.
- Most Important: Just below the file list is the “File Format” field. Select “ANT+ FIT file (*.fit) in the drop down menu.
- Click “Save” and the converted file is saved to your computer.
Step Six: Upload File To Vitality
- Login to you Discovery Vitality account.
- On the right end of the navigation bar hover over “wellness Tools” and select “Devices” from the drop down.

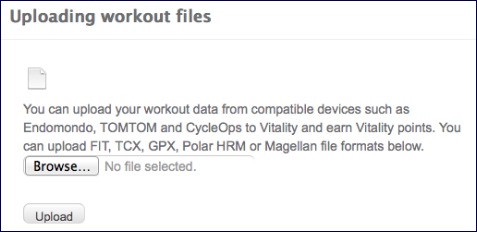
- Scroll down the list of devices to the second link from the bottom “Upload your workout files” and click this link.

- On the screen that appears click Browse, find the location of the file, select it and click Open.
- When the upload screen reappears, click “Upload” and you’re done.
To check that your points have uploaded:
- Click on “Go to Discovery.co.za” at the top of the Vitality page.
- On the Discovery page hover over “Vitality” on the navigation bar.
- In the middle column under “Points and status” select “Vitality Points Monitor.”
- On the points monitor scree, scroll down to “Categories” and click on “Get Active.” A list of all activity points can be found there with dates.
Enjoy your training!


Leave a Reply